Find everything you need to know regarding grill safety and operation here:
Find everything you need to know about assembly here:
Position your heat shield so the “V” on the bottom is centered over the firepot. This piece will split your rising heat left and right, so proper placement is crucial.
If your grill seems to run hotter than what it displays, or if it has a hot right side, move your heat shield further to the right. If the grill is running cooler, move it to the left. A general rule is half an inch for every 50 degrees of difference you experience. Once the perfect placement is achieved, measure the shields distance to the left wall of the grill for future reference.

We use two finger widths as a general rule for cap height. If you are experiencing any temperature or combustion related issues, raise your cap up all the way to give your grill enough space to release exhaust.
To adjust, loosen nut at base of the screw, then adjust the nut on the top of the chimney cap either up or down. Tighten set screw to secure in place.
After every cook, drop the temp to 150 degrees on the digital readout, then press the down arrow one more time. The LCD screen will read “fan” and run a timed cycle to blow out all the excess ash. Once the fan cycle is complete the grill will display “off” and is ready to be used again.
You will need to periodically clean out the burn pot for the grill to run efficiently. A general rule is to clear any ash from the pot after every bag of pellets you burn.
Hang the grease bucket on the hook underneath the side tray table on the right. If you like, you may line the grease bucket with foil for easy cleaning.
To install the chimney you will need a 10mm wrench or socket. Tighten the chimney securely to the side of the grill. Make sure that the gasket goes between the chimney and the grill itself.
To view the Prime App Manual Click Here.
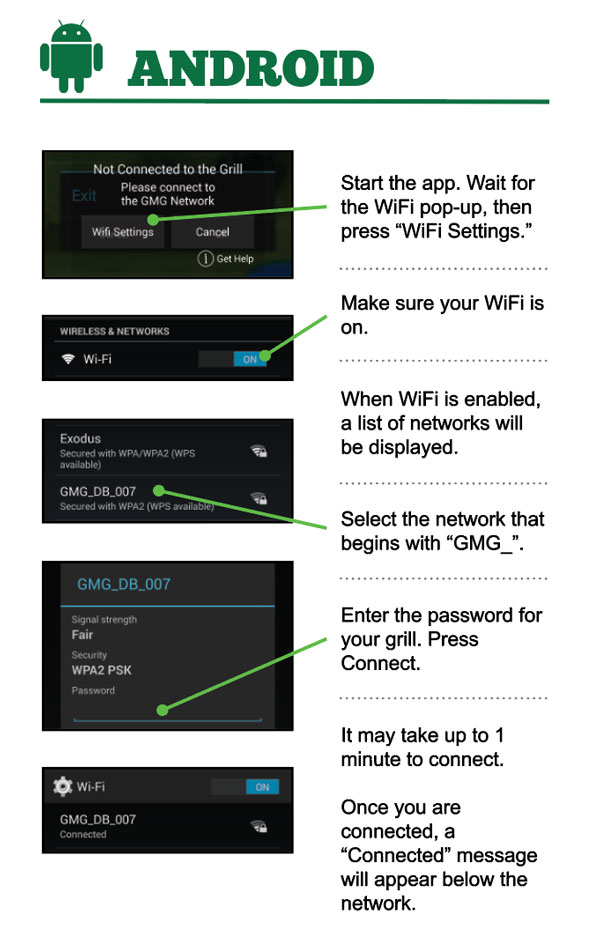
Your grill’s password is the grill’s serial number found on the green plate located on back of your grill. It should be 8 characters.

First confirm the grill is plugged in and has power. The grill display should read “off”.
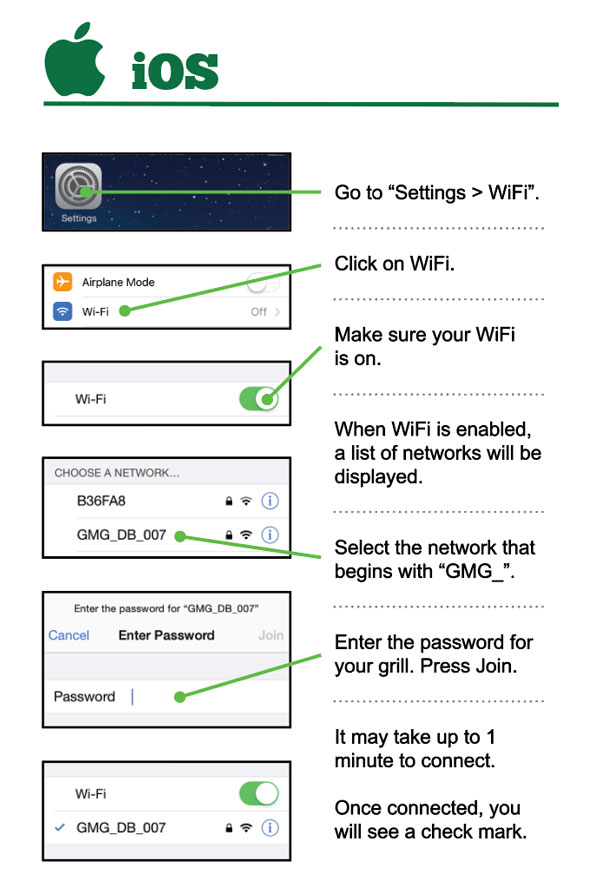
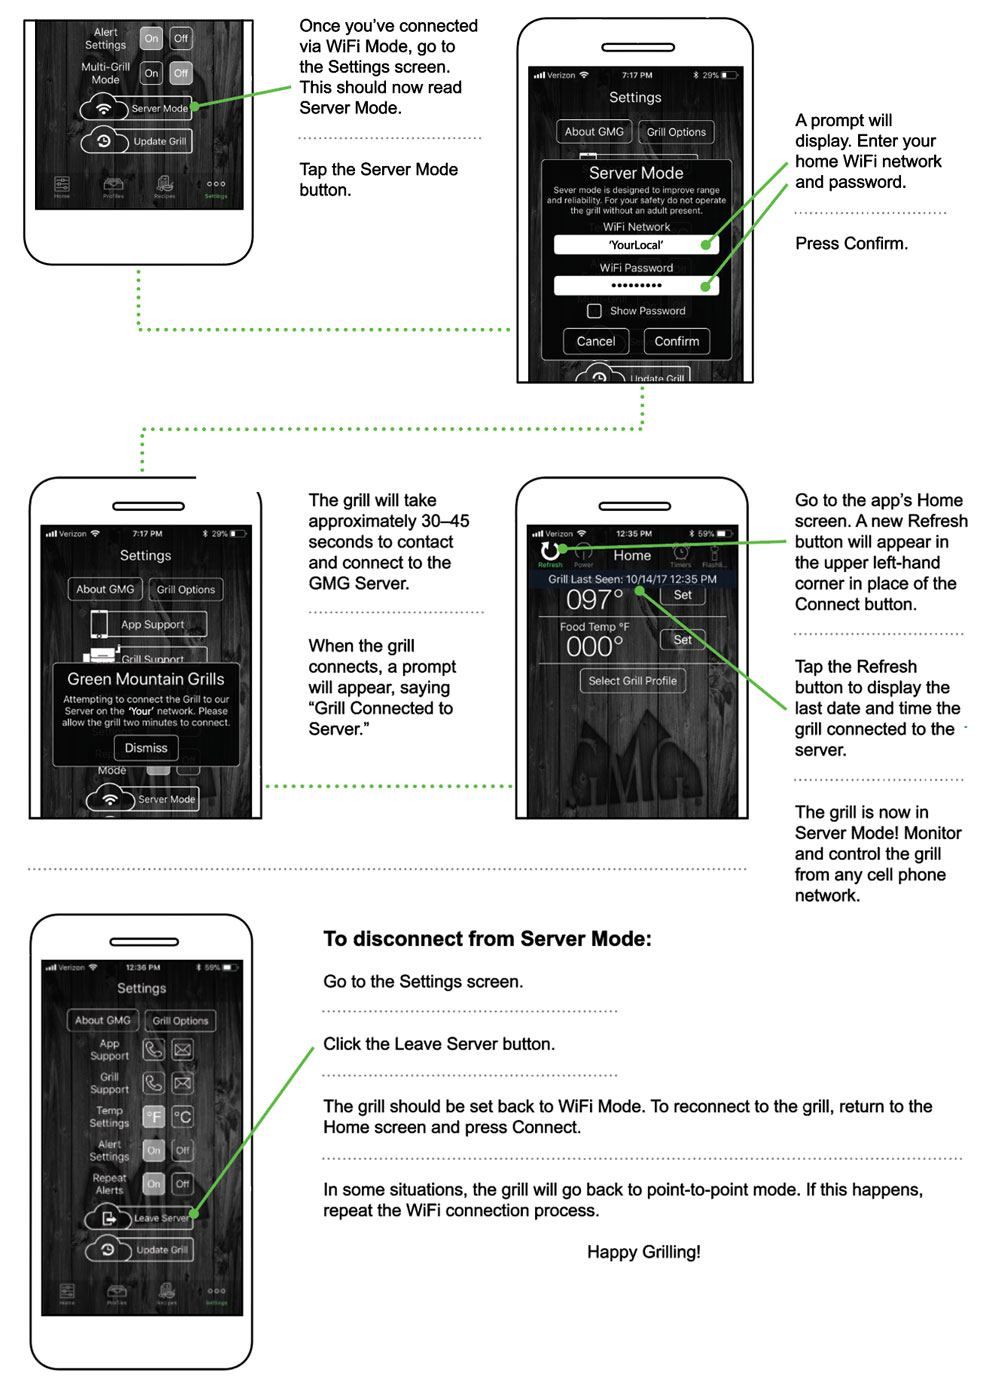
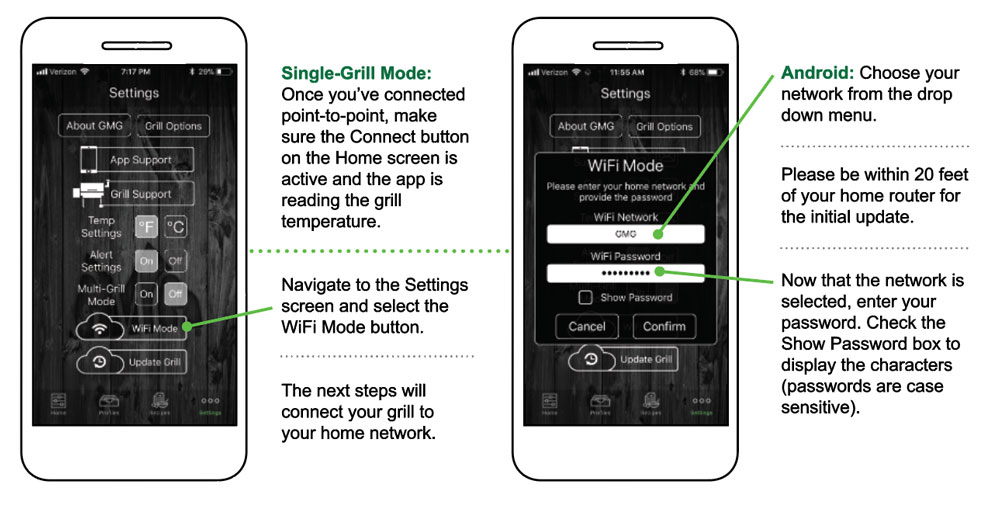
In order to connect via WiFi Mode you must first establish a point-to-point connection to your grill’s network. See the previous section on how to connect via point-to-point.

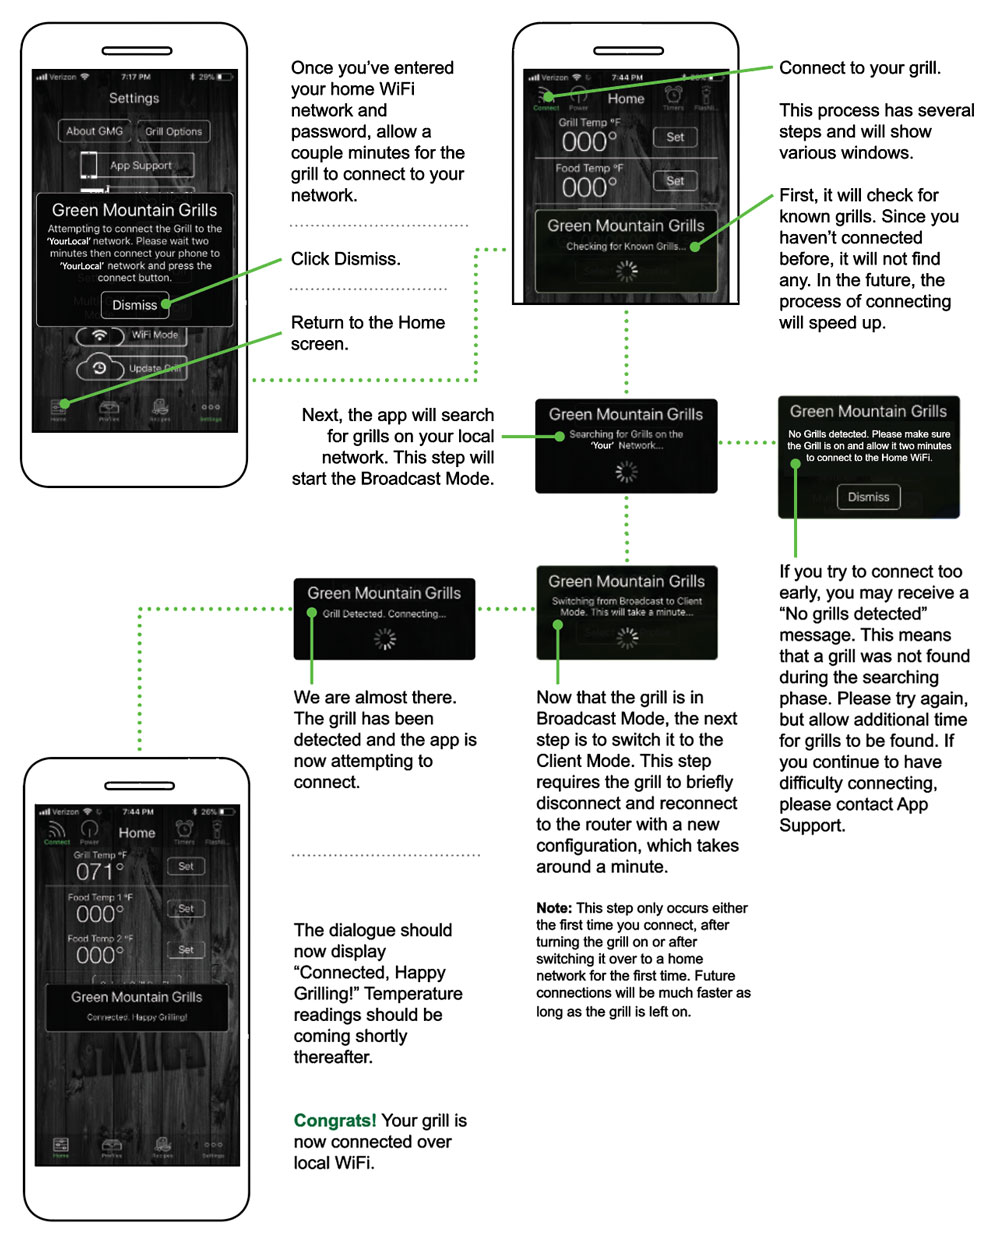
Your grill must be connected to your local home WiFi network before you can connect to the GMG server. See the previous section on how to connect via WiFi Mode.
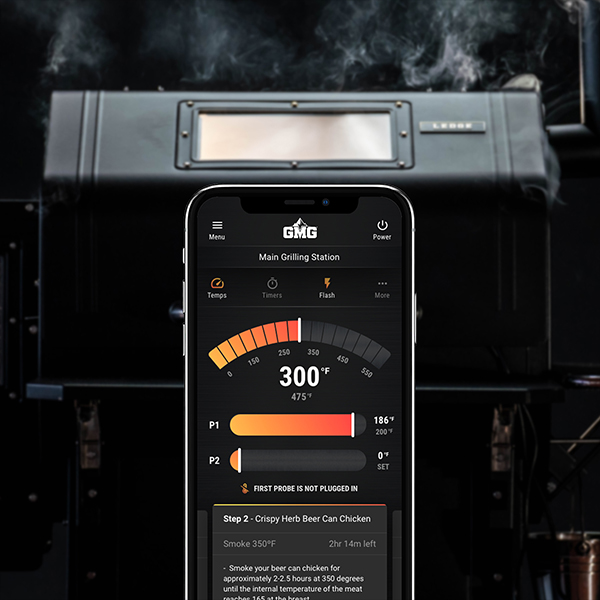
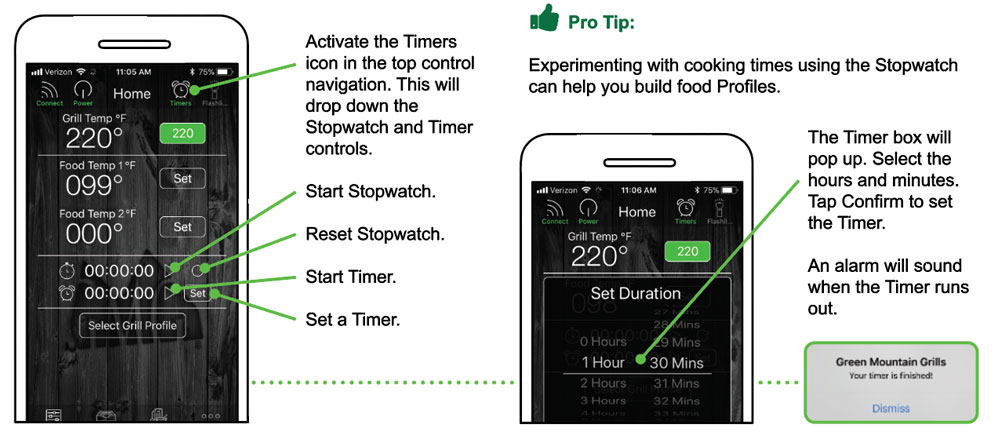
Track the internal temp of your food with our dual meat probes. Monitor multiple meats at the same time or if you’re cooking a large cut of meat, keep track of outer and inner temps simultaneously.

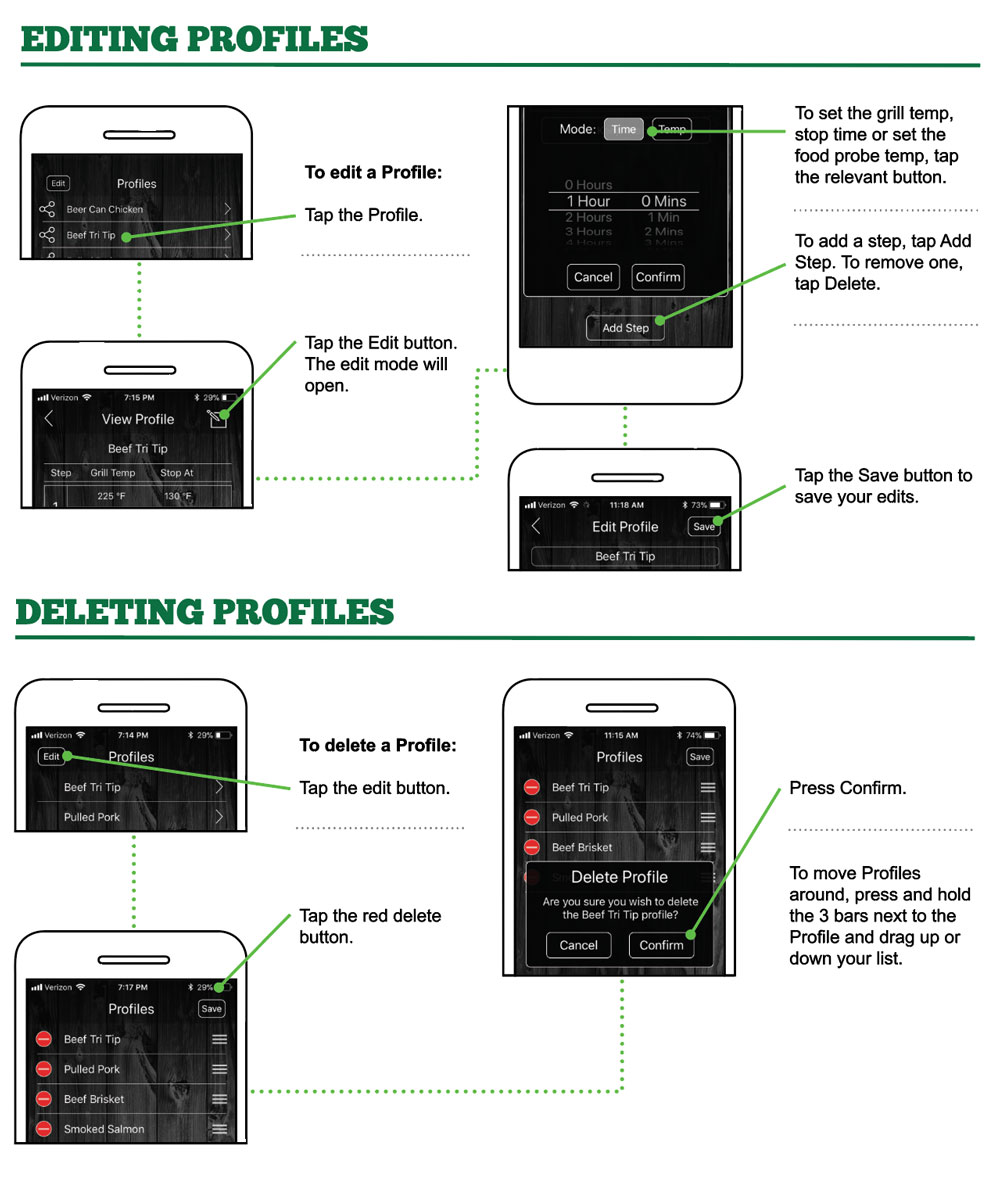
Profiles allow you to create and use customizable and programmable cooking instructions to make grilling that much easier! Whether you’re smoking rigs, slow-cooking a brisket or just grilling chicken breast, Profiles allow you to easily record and repeat your cook at the click of a button.
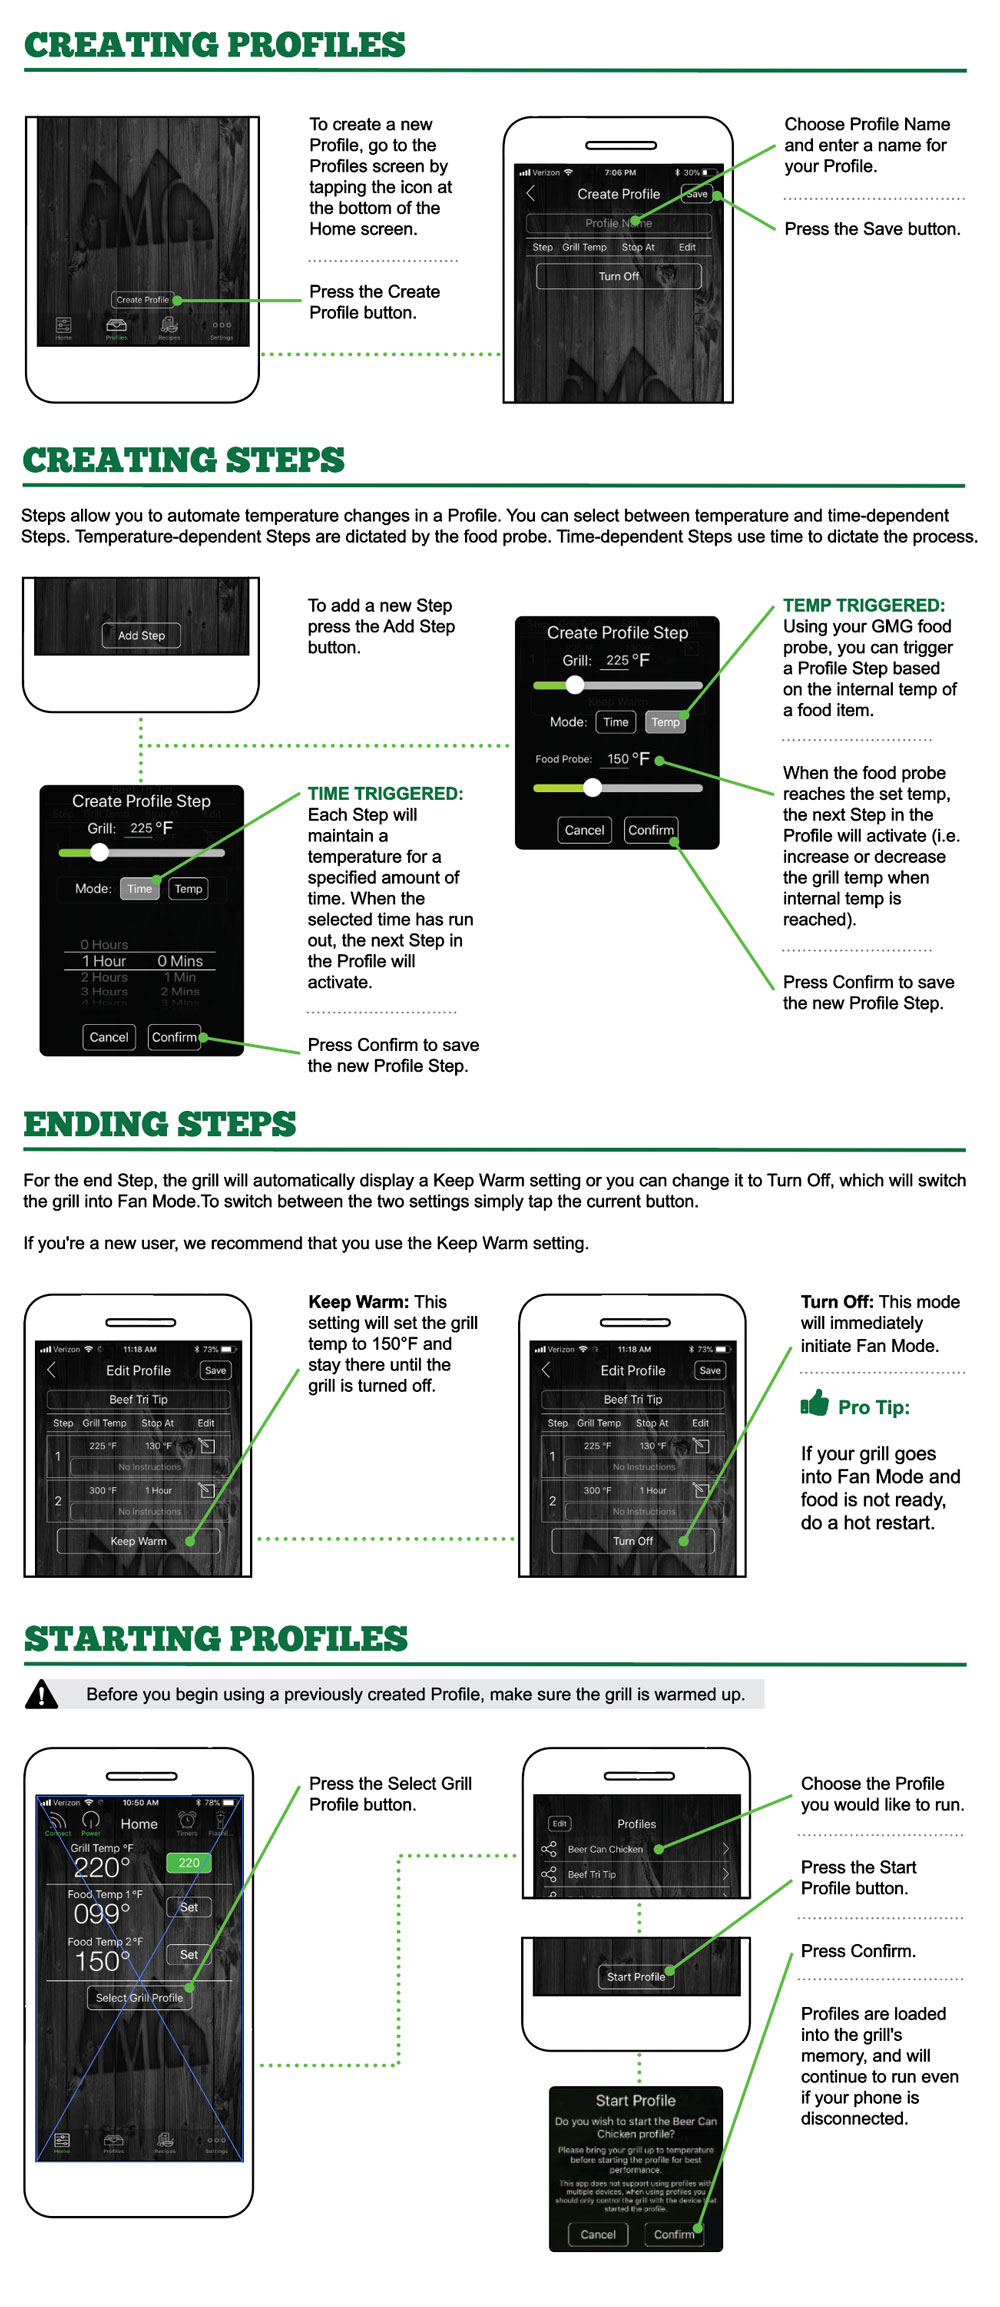
No worries! When a profile is started it is saved to the grill’s controller and will continue to run until it is stopped or overridden by manual controls.
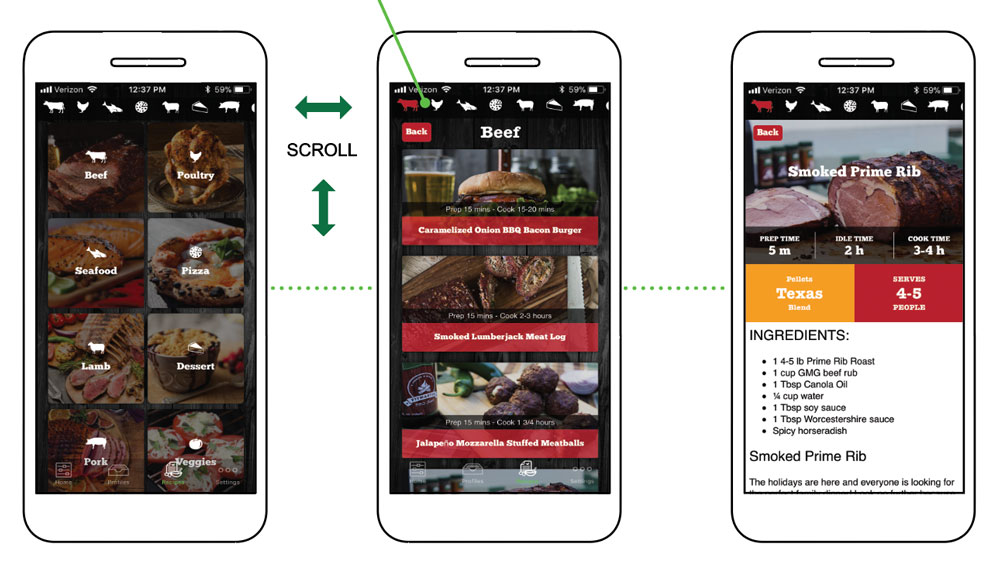
You have access to all of our great GMG recipes at your fingertips! Scroll through our 12 different recipe categories to find whatever you’re in the mood for. Use the icon menu at the top to switch between categories.
Latest Firmware Version: 1.6
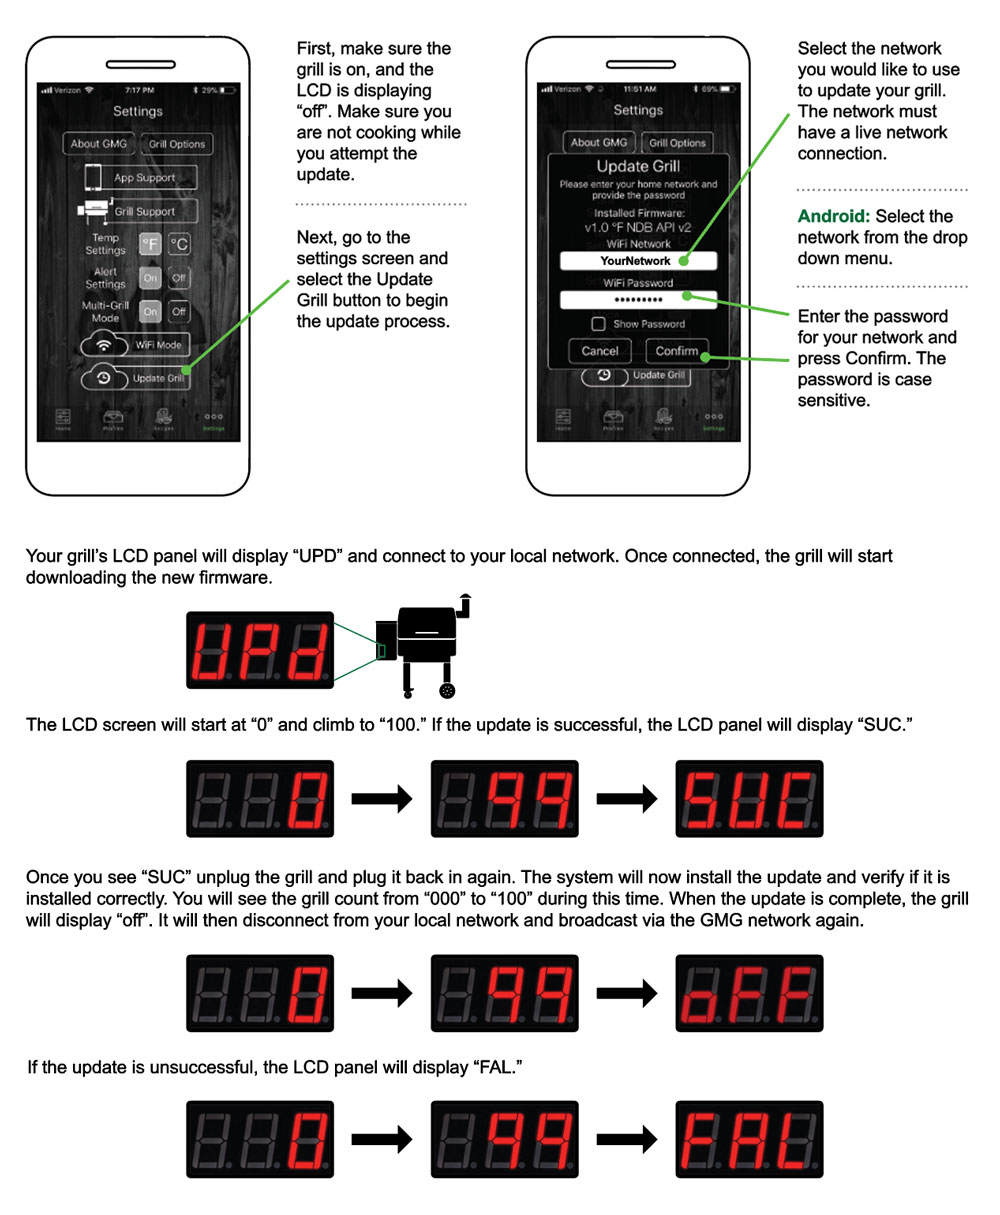
To update your grill’s firmware you will need to connect your grill to your home WiFi network and download the update. Firmware updates and application updates are separate. You will need to be at least within 20 feet of your home network. Updating your firmware typically isn’t necessary unless you are experiencing an issue with the device.

If your update fails:
If you have more than one grill with WiFi, you can control each grill separately. You will need to connect to each grill separately and connect them to your local WiFi following the steps in single grill mode.
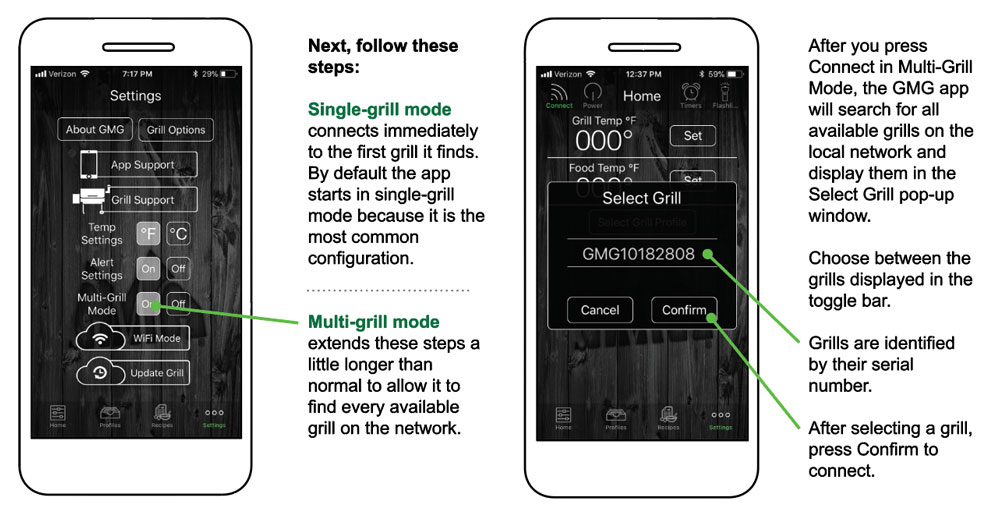
No, you can only have one phone hooked up at a time. When a new device connects it will kick off the other phone. The grill is active on the last device that connected to it. If you connect with your phone then afterwards your wife connects with her phone, her phone will take over control of the grill.
If the grill fails to connect to the server or disconnects from the server it will attempt to reconnect up to 3 times, every 90 seconds. If it fails to reconnect after 3 tries, (about 5 minutes) it will revert to WiFi mode or PtoP mode, depending on if it’s able to detect if it’s a client on your WiFi. Similarly if the grill is disconnected from WiFi mode it will attempt to reconnect up to 3 times, and revert to PtoP mode if unsuccessful.
If the grill still does not connect, it may have fallen back to Point to Point mode. If this happens, open the WiFi settings on your phone and check to see if the grill is broadcasting a network. If it is, start the connection process over. If it is not broadcasting the network, you will have to do a board reset.
If auto-revert is disabled, the grill will continue to try to re-establish its last configuration until reset. This can be helpful for less reliable internet connections.
To view the App Manual Click Here.
Your grill’s password is the grill’s serial number found on the green plate located on back of your grill. It should be 8 characters.
First confirm the grill is plugged in and has power. The grill display should read “off”.
In order to connect via WiFi Mode you must first establish a point-to-point connection to your grill’s network. See the previous section on how to connect via point-to-point.
Your grill must be connected to your local home WiFi network before you can connect to the GMG server. See the previous section on how to connect via WiFi Mode.
Track the internal temp of your food with our dual meat probes. Monitor multiple meats at the same time or if you’re cooking a large cut of meat, keep track of outer and inner temps simultaneously.
Profiles allow you to create and use customizable and programmable cooking instructions to make grilling that much easier! Whether you’re smoking rigs, slow-cooking a brisket or just grilling chicken breast, Profiles allow you to easily record and repeat your cook at the click of a button.
No worries! When a profile is started it is saved to the grill’s controller and will continue to run until it is stopped or overridden by manual controls.
You have access to all of our great GMG recipes at your fingertips! Scroll through our 12 different recipe categories to find whatever you’re in the mood for. Use the icon menu at the top to switch between categories.
Latest Firmware Version: 1.6
To update your grill’s firmware you will need to connect your grill to your home WiFi network and download the update. Firmware updates and application updates are separate. You will need to be at least within 20 feet of your home network. Updating your firmware typically isn’t necessary unless you are experiencing an issue with the device.
If your update fails:
If you have more than one grill with WiFi, you can control each grill separately. You will need to connect to each grill separately and connect them to your local WiFi following the steps in single grill mode.
No, you can only have one phone hooked up at a time. When a new device connects it will kick off the other phone. The grill is active on the last device that connected to it. If you connect with your phone then afterwards your wife connects with her phone, her phone will take over control of the grill.
If the grill fails to connect to the server or disconnects from the server it will attempt to reconnect up to 3 times, every 90 seconds. If it fails to reconnect after 3 tries, (about 5 minutes) it will revert to WiFi mode or PtoP mode, depending on if it’s able to detect if it’s a client on your WiFi. Similarly if the grill is disconnected from WiFi mode it will attempt to reconnect up to 3 times, and revert to PtoP mode if unsuccessful.
If the grill still does not connect, it may have fallen back to Point to Point mode. If this happens, open the WiFi settings on your phone and check to see if the grill is broadcasting a network. If it is, start the connection process over. If it is not broadcasting the network, you will have to do a board reset.
If auto-revert is disabled, the grill will continue to try to re-establish its last configuration until reset. This can be helpful for less reliable internet connections.
Alternate: 1.5, Latest: 1.6, Prototype: 1.4
1.6 – Add Cold Smoke Mode and adjust Climate Slider values
1.4 – Improvements to WiFi and Server Mode connectivity. Support for new Pizza Mode. Uses temperature control of 1.2
1.5 – Improvements to WiFi and Server Mode connectivity. Support for new Pizza Mode. Uses temperature control of 1.3
1.3 – New Temperature Control Algorithm, Add Climate Slider
1.2 – Improved Temperature Control, various bug fixes including 2 probe support
1.1 – Initial Version
Grill is off.
Fan Mode is on.
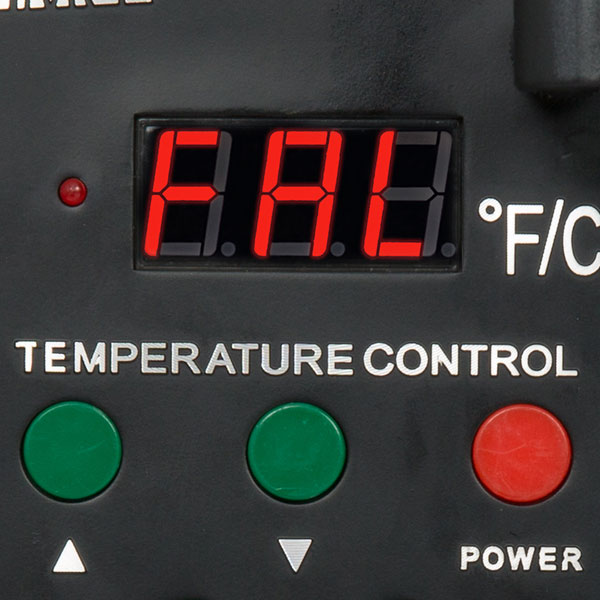
Grill is attempting to update. It will count from 0-100 and either display SUC for a successful update or FAL for update failure. See the FAL section below for more info.
Updates were successful.
Ignition Failure or Firmware Update Failure:
If you see the FAL code displayed shortly after turning the grill on you are experiencing an Ignition Failure which can be due to one of the following situations:
Firmware Update Failure:
This can be due to one of two things:
No Food Found. This can be due to the food probe not being completed inserted into the control board. Make sure the probe is securely inserted into the control board. If you’re still seeing NFD you may have a faulty food probe which can be replaced.
Food temp is ready to display once you have pressed the food button. Always MAKE SURE to press the food button again to toggle back to the grill temp before before trying to increase or decrease the grill temp otherwise a manual food probe alert will be set.
Sensor Failure. This can display in two situations:
Circuit board calibration. This is very uncommon but in the case you do see this display you will need to replace your control board.
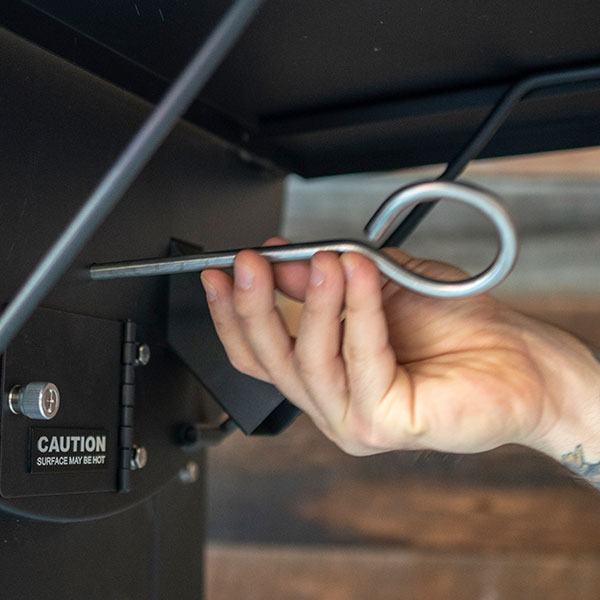
While all bbq’s have hotspots, GMG gives you some control over your heat distribution through the adjustable heat shield technology. Majority of bbq’s tend to have hot spots. Don’t worry, we’ve made it very easy to correct this even mid-cook. The heat distribution can be corrected by making small adjustments to your heat shield placement with the external adjustment handle.
GENERAL RULE OF THUMB: If your grill seems to run hotter on the right side, slightly adjust your heat shield to the right and vice versa. Generally a quarter an inch adjustment can create a 50° difference. 4.25 in. from the left wall is the sweet spot to start out at which should align the right outside grill wall with the -0.5 mark on the adjustment handle. Keep in mind this is a starting position, environmental factors like ground levelness, alltitude, humidity, etc play a role in the way heat distributes through your grill. Fortunately the adjustable technology allows you to customize your heat distribution to what works best for you.

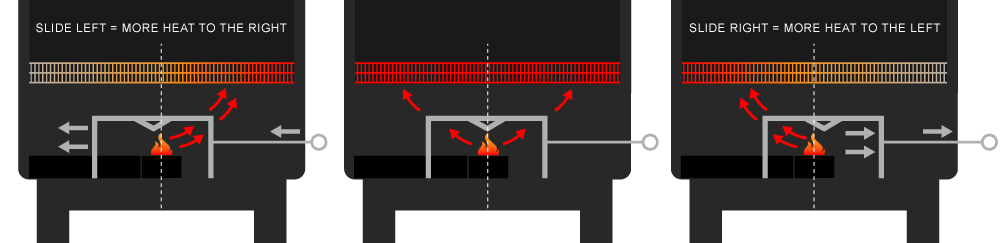
PRO TIP: Once you find the best heat shield placement for your grill, we encourage you to measure the distance from the shield to the left wall of the grill, that way you can repeat that positioning after every time the grill is relocated or parts are removed for cleaning.
Possible causes (you may see an FAL code display on control board screen when this occurs):
No worries, you probably just need to refill your hopper with pellets. If the hopper is full and the alarm is still beeping, you can disconnect and reconnect the alarm from the back of the control panel. If the beeping persists, your alarm is broken and can be replaced.
NOTE: The low pellet alarm is not necessary for the grills functionality. You can leave the Alarm disconnected and continue cooking with no issues.
If you using charcoal pellets or very dark colored wood pellets, this can
When your grill goes through its startup process, it is not unusual to see a great deal of smoke especially when the fans start the fire. Once you reach the default temperature of 150 degrees, you are in a smoke setting. Traditional smoke settings will go up to 225 degrees. In this range of temperatures, you will see a steady flow of smoke as the grill is feeding more pellets into the firebox at the loss of temperature. As your grill is maintaining temps, you will not see as much smoke. As you increase the temperature controller above 225 all the way up to 550 degrees, you will see even less smoke as you reach into barbecue temperatures, due to the high flame.
Note: Generally, you get more smoke at lower temps than at high ones. That being said, pellets burn extremely efficiently because of their shape and density, so they will not produce as much smoke as a stick burner.
This can be due to a few things. ALWAYS make sure your grill is powered down and cooled off before checking internal parts.
The GMG hopper box is pressurized for both safety and performance. This positive pressure should prevent any burn back from going back through the auger and into the hopper as long as the lid is closed. If the lid closed and you’re still receiving smoke into the hopper it could be due to:
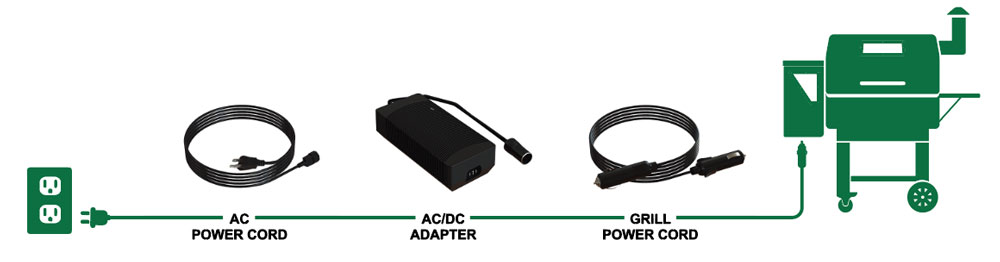
This can be due to a few things. First there are 4 different points of connection from the outlet to you grill. Make sure each is securely fastened.
If all connections are secure you may need to check your power source. It is possible your GFCI or breaker has tripped, cutting power to the grill.
If you confirm power to the outlet, it’s time to check out the control panel on your grill. ALWAYS MAKE SURE YOU UNPLUG YOUR GRILL before you start looking over any parts.
If this hasn’t solved your issue you will need to check the fuse.
At times, the wires underneath your hopper assembly will shift and block your combustion fan. Take a look underneath your grill for a wire obstruction and simply move it away from your combustion fan blade. This will end the clicking noise.
If your grill is making a clicking noise and the auger does not run, most likely there is a stripped gear in the gearbox, and the auger motor will have to be replaced.
Pellet bridging is a common symptom of loss of positive pressure. Make sure the type of pellets you’re using are not over 1 1/4 long. Longer pellets are prone to bridging. Pellets should have a shinny finish. If the shinny finish has worn down the pellets are deteriorating and will cause bridging.
Jammed Auger
Turn the grill into cycle 0 by pressing the power button (first stage of the normal start-up procedure), and listen for the auger motor. If the motor engages, look inside your firebox toward the end of the auger bit to determine if the auger is spinning. If the auger is spinning but you don’t have pellets feeding into the firebox, you have pellets bridged up over the intake of the auger tube. Turn the grill off, sift the pellets around inside the hopper, and put the grill back into cycle 0. Wait until the pellets emerge into the firebox. It may take up to 2 full cycle 0’s to get pellets all the way through the auger tube.
If you have determined that your auger does not turn when the auger motor is engaged, you can try to work the affected pellets through the auger tube to clear out the jam. Remove the grease try and heat shield from the body of the grill. Remove all pellets from the hopper and the firebox.
Once the auger tube is clear, you will need to refill it with fresh pellets by running cycle 0 a few more times after the hopper has been filled. Once you see fresh pellets coming out, turn off the grill and start it up again through the entire 0-1-2-3 process with the heat shield and grease tray installed properly.
There’s no need for concern if your fan is not blowing at a constant speed. The variable speed fan will run at various different RPM’s and pulsate in order to maintain the most stable and precise temperature. The fan should run continuously from cycle 2 on start-up until the grill completes the fan mode on power down.
To check if it’s running properly:
Simply press the red power button to switch it into fan mode.
NEVER just unplug the grill while it is on or in fan mode. Fan mode is very important as it not only cools down the grill properly but also blows ash out of the firebox for your next cook. Once fan mode is complete and the display reads off, hold down the power button for 7 secs until the screen goes dark.

At this point the grill has successfully powered down. You can leave the grill plugged in for quicker power up next time or unplug it if you prefer.
The first thing we’ll need to do is reset your grill and attempt an update.
There are two reasons we want to focus on updating:
So what I’d like you to do is confirm the following after performing a reset of the grill and attempt an update:
While all bbq’s have hotspots, GMG gives you some control over your heat distribution through the adjustable heat shield technology. Majority of bbq’s tend to have hot spots. Don’t worry, we’ve made it very easy to correct this even mid-cook. The heat distribution can be corrected by making small adjustments to your heat shield placement with the external adjustment handle.
GENERAL RULE OF THUMB: If your grill seems to run hotter on the right side, slightly adjust your heat shield to the right and vice versa. Generally a quarter an inch adjustment can create a 50° difference. 4.25 in. from the left wall is the sweet spot to start out at which should align the right outside grill wall with the -0.5 mark on the adjustment handle. Keep in mind this is a starting position, environmental factors like ground levelness, alltitude, humidity, etc play a role in the way heat distributes through your grill. Fortunately the adjustable technology allows you to customize your heat distribution to what works best for you.
PRO TIP: Once you find the best heat shield placement for your grill, we encourage you to measure the distance from the shield to the left wall of the grill, that way you can repeat that positioning after every time the grill is relocated or parts are removed for cleaning.
Possible causes (you may see an FAL code display on control board screen when this occurs):
No worries, you probably just need to refill your hopper with pellets. If the hopper is full and the alarm is still beeping, you can disconnect and reconnect the alarm from the back of the control panel. If the beeping persists, your alarm is broken and can be replaced.
NOTE: The low pellet alarm is not necessary for the grills functionality. You can leave the Alarm disconnected and continue cooking with no issues.
If you using charcoal pellets or very dark colored wood pellets, this can
When your grill goes through its startup process, it is not unusual to see a great deal of smoke especially when the fans start the fire. Once you reach the default temperature of 150 degrees, you are in a smoke setting. Traditional smoke settings will go up to 225 degrees. In this range of temperatures, you will see a steady flow of smoke as the grill is feeding more pellets into the firebox at the loss of temperature. As your grill is maintaining temps, you will not see as much smoke. As you increase the temperature controller above 225 all the way up to 550 degrees, you will see even less smoke as you reach into barbecue temperatures, due to the high flame.
Note: Generally, you get more smoke at lower temps than at high ones. That being said, pellets burn extremely efficiently because of their shape and density, so they will not produce as much smoke as a stick burner.
This can be due to a few things. ALWAYS make sure your grill is powered down and cooled off before checking internal parts.
The GMG hopper box is pressurized for both safety and performance. This positive pressure should prevent any burn back from going back through the auger and into the hopper as long as the lid is closed. If the lid closed and you’re still receiving smoke into the hopper it could be due to:
This can be due to a few things. First there are 4 different points of connection from the outlet to you grill. Make sure each is securely fastened.
If all connections are secure you may need to check your power source. It is possible your GFCI or breaker has tripped, cutting power to the grill.
If you confirm power to the outlet, it’s time to check out the control panel on your grill. ALWAYS MAKE SURE YOU UNPLUG YOUR GRILL before you start looking over any parts.
If this hasn’t solved your issue you will need to check the fuse.
At times, the wires underneath your hopper assembly will shift and block your combustion fan. Take a look underneath your grill for a wire obstruction and simply move it away from your combustion fan blade. This will end the clicking noise.
If your grill is making a clicking noise and the auger does not run, most likely there is a stripped gear in the gearbox, and the auger motor will have to be replaced.
Pellet bridging is the build up of pellets over the auger intake at the bottom of the hopper. This is a common symptom of loss of positive pressure. Condensation can accumulate in the bottom of the hopper and in the auger tube causing pellets to stick together and build up. A few things to look out for:
Jammed Auger can be caused by a couple things:
Inorder to diagnose and resolve, first turn the grill into cycle 0 by pressing the power button (first stage of the normal start-up procedure), and listen for the auger motor. If the motor engages, look inside your firebox toward the end of the auger bit to determine if the auger is spinning. If the auger is spinning but you don’t have pellets feeding into the firebox, you have pellets bridged up over the intake of the auger tube. Turn the grill off, sift the pellets around inside the hopper, and put the grill back into cycle 0. Wait until the pellets emerge into the firebox. It may take up to 2 full cycle 0’s to get pellets all the way through the auger tube.
If you have determined that your auger does not turn when the auger motor is engaged, you can try to work the affected pellets through the auger tube to clear out the jam. Remove the grease try and heat shield from the body of the grill. Remove all pellets from the hopper and the firebox.
Once the auger tube is clear, you will need to refill it with fresh pellets by running cycle 0 a few more times after the hopper has been filled. Once you see fresh pellets coming out, turn off the grill and start it up again through the entire 0-1-2-3 process with the heat shield and grease tray installed properly.
There’s no need for concern if your fan is not blowing at a constant speed. The variable speed fan will run at various different RPM’s and pulsate in order to maintain the most stable and precise temperature. The fan should run continuously from cycle 2 on start-up until the grill completes the fan mode on power down.
To check if it’s running properly:
Simply press the red power button to switch it into fan mode.
NEVER just unplug the grill while it is on or in fan mode. Fan mode is very important as it not only cools down the grill properly but also blows ash out of the firebox for your next cook. Once fan mode is complete and the display reads off, hold down the power button for 7 secs until the screen goes dark.
At this point the grill has successfully powered down. You can leave the grill plugged in for quicker power up next time or unplug it if you prefer.